At the present time, 3D printing is changing how we create objects. In essence, it builds items layer by layer using digital designs. As a result, industries can produce parts faster and with less waste. To put it differently, instead of cutting material away, this process adds only what is needed. With this in mind, understanding how 3D printing works step by step helps you see its real power.
What Is 3D Printing
At first, 3D printing refers to a process called additive manufacturing. In contrast, traditional manufacturing removes material from a block. As a matter of fact, this difference saves both time and resources. To illustrate, engineers can print prototypes within hours instead of weeks.
In general, this technology is used in healthcare, aerospace, and education. As well as that, students use it to learn design and engineering skills. Another key point is customization. Doctors can create implants tailored to each patient. All things considered, 3D printing improves innovation and efficiency across industries.
How 3d Printing Works Step by Step
At the present time, 3D printing follows a clear step-by-step process. In simple terms, it starts with a digital design and ends with a finished object. As a result, each stage plays an important role in building accurate and strong parts. With this in mind, let us understand each step in order.
Step 1: Creating the 3D Model

At first, the process begins with a digital design. Designers use CAD software to build a 3D model. To explain, this model acts as a blueprint for the printer. As a result, every detail in the design affects the final object.
At least, beginners can download ready-made models from online libraries. In this case, they avoid complex design work. After that, the file is saved in formats like STL. As has been noted, this format defines the shape of the object clearly. With attention to detail, proper design ensures a successful print.
Step 2: Slicing the Model
To put it differently, slicing converts the model into thin layers. Each layer represents a cross-section of the object. As a result, the printer can build the object step by step.
At the present time, slicing software generates instructions called G-code. In essence, this code guides the printer’s movements. To enumerate, it controls speed, temperature, and layer height. Balanced against quality, users adjust these settings carefully. In effect, better slicing leads to smoother and more accurate prints.
Step 3: Preparing the 3D Printer
At this point, the printer must be set up properly. First, users load the printing material. Common options include PLA and ABS plastics. As a result, material choice affects strength and appearance.
After that, the build plate is leveled. Provided that it is uneven, the print may fail. To explain, leveling ensures proper adhesion of layers. At the same time, the printer heats the nozzle to melt the material. In addition, calibration ensures accurate movement. At last, the printer is ready to begin.
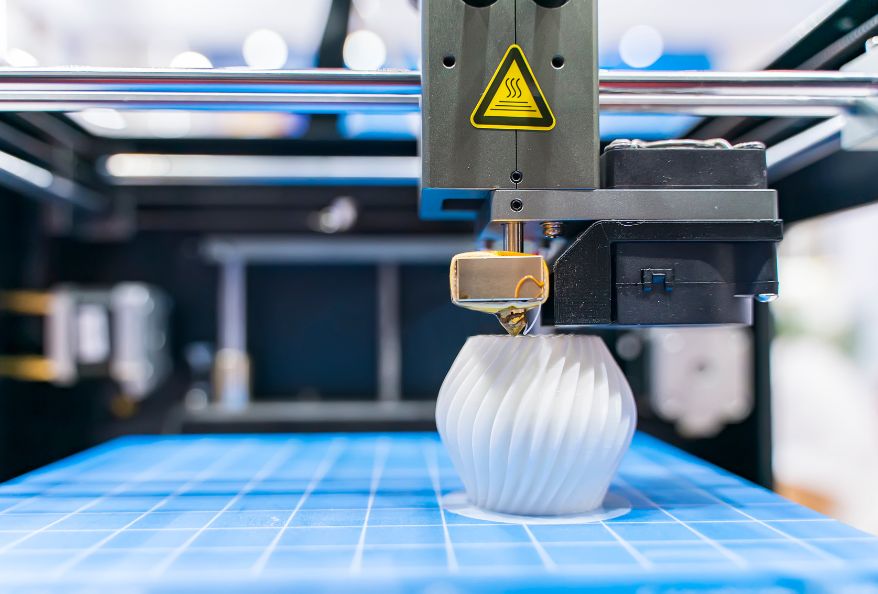
Step 4: Printing Layer by Layer
At this instant, the printer starts building the object. The nozzle deposits material in thin layers. As a result, each new layer bonds to the previous one. To illustrate, it is similar to stacking sheets of paper.
In fact, motors control movement along three axes. This allows precise positioning in 3D space. With the result that, complex shapes can be created easily. At length, printing may take several hours depending on size and detail. All in all, patience plays a key role in 3D printing.
Step 5: Cooling and Solidifying
After that, the printed material begins to cool. For plastics, cooling makes the object solid and stable. As a result, the structure gains strength. In similar fashion, resin prints use UV light for curing.
Provided that cooling happens too quickly, defects may appear. For example, warping can distort the object. In this case, controlled cooling is important. In due time, the object stabilizes and becomes ready for removal. As has been noted, proper cooling ensures better quality.
Step 6: Post-Processing the Print
To explain, many prints require finishing steps. First, support structures are removed carefully. These supports hold parts during printing. After all, gravity can affect the process.
In detail, surfaces may be sanded or polished. As a result, the object looks smoother. In addition, painting or coating can improve appearance. At last, users inspect the object for defects. To sum up, post-processing enhances both quality and usability.
Different Types of 3D Printing Technologies
At the present time, many 3D printing technologies exist. As a result, each method serves different needs. With this in mind, here is a simple list to understand how 3d printing works step by step across technologies.
1. FDM (Fused Deposition Modeling)
- Uses melted plastic filament to build layers
- Most common and beginner-friendly method
- Low cost and easy to operate
- Suitable for prototypes and basic models
2. SLA (Stereolithography)
- Uses liquid resin cured by a laser
- Produces smooth and highly detailed objects
- Ideal for dental, jewelry, and precision parts
- Requires careful handling and cleaning
3. SLS (Selective Laser Sintering)
- Uses powdered materials like nylon
- Laser fuses powder into solid layers
- No support structures needed
- Suitable for strong and complex designs
4. DLP (Digital Light Processing)
- Uses digital light to cure resin
- Cures entire layers at once
- Faster than SLA in many cases
- Maintains high detail and accuracy
5. Binder Jetting
- Uses a liquid binder to join powder particles
- Works with sand, metal, and ceramics
- Requires post-processing for strength
- Used in industrial and casting applications
6. Metal 3D Printing (DMLS/SLM)
- Uses lasers to melt metal powder
- Produces strong and precise metal parts
- Used in aerospace and medical industries
- Suitable for complex engineering components
Advantages and Limitations of 3D Printing
Above all, 3D printing reduces material waste. As well as that, it enables fast prototyping. To list, customization is another major advantage. In addition, it lowers costs for small production runs.
However, printing large objects can take more time. In contrast, traditional manufacturing is faster for mass production. At the same time, material choices are still limited. All things considered, the benefits often outweigh the challenges.
Emerging Trends in 3D Printing
At the present time, 3D printing is evolving quickly. As a result, new trends are improving speed and efficiency. With this in mind, these changes are shaping the future of manufacturing.
Key Trends Shaping 3D Printing
1. Multi-Material and Hybrid Printing
Multi-material printing combines different properties in one object. As a result, parts become stronger and more flexible. In addition, hybrid machines can print and refine parts. In this case, accuracy improves significantly.
2. Bioprinting in Healthcare
Bioprinting is growing in healthcare applications. Scientists print tissues using living cells. As a result, this supports medical research and treatments. In fact, it may help create organs in the future.
3. Faster and Large-Scale Printing
Speed improvements allow large-scale production. Some systems can print buildings. As well as that, industries are moving toward mass manufacturing. In short, production is becoming faster and more scalable.
4. Sustainable Materials
Sustainability is a key focus in modern 3D printing. New materials include recycled and biodegradable plastics. As a result, environmental impact decreases. In addition, waste is reduced significantly.
5. AI and Smart Printing Systems
AI integration improves printing accuracy. It detects errors early and optimizes designs. As a result, failure rates decrease. In short, smart systems make 3D printing more reliable and efficient.
Final Thoughts
In conclusion, how 3D printing works step by step becomes simple to understand. At first, a digital model guides the process. After that, slicing prepares instructions for the printer. Then, the machine builds the object layer by layer.
As a result, 3D printing is transforming modern manufacturing. In essence, it offers flexibility and innovation. With this in mind, learning this technology opens new opportunities.
References
- Ford, S., & Despeisse, M. (2016). Additive manufacturing and sustainability: An exploratory study. Journal of Cleaner Production, 137, 1573–1587. https://doi.org/10.1016/j.jclepro.2016.04.150
- Wang, T., Yamakawa, Y. Enhancing precision in 3D printing for highly functional printing with high-speed vision. Int J Adv Manuf Technol 135, 1343–1353 (2024). https://doi.org/10.1007/s00170-024-14594-5
Kottauppari Venkat Raghava
I am a technology-driven IT graduate with a strong passion for science and innovation. I am fascinated by how innovations like artificial intelligence, robotics, and emerging technologies are shaping our world. I specialize in analyzing complex scientific and technological research and presenting it in a clear, accessible way. My goal is to make science and technology understandable and engaging for students, tech enthusiasts, and professionals alike. By breaking down advanced concepts into simple, insightful narratives, I strive to inspire curiosity, learning, and innovation, helping readers stay informed about the breakthroughs that are shaping the future.