
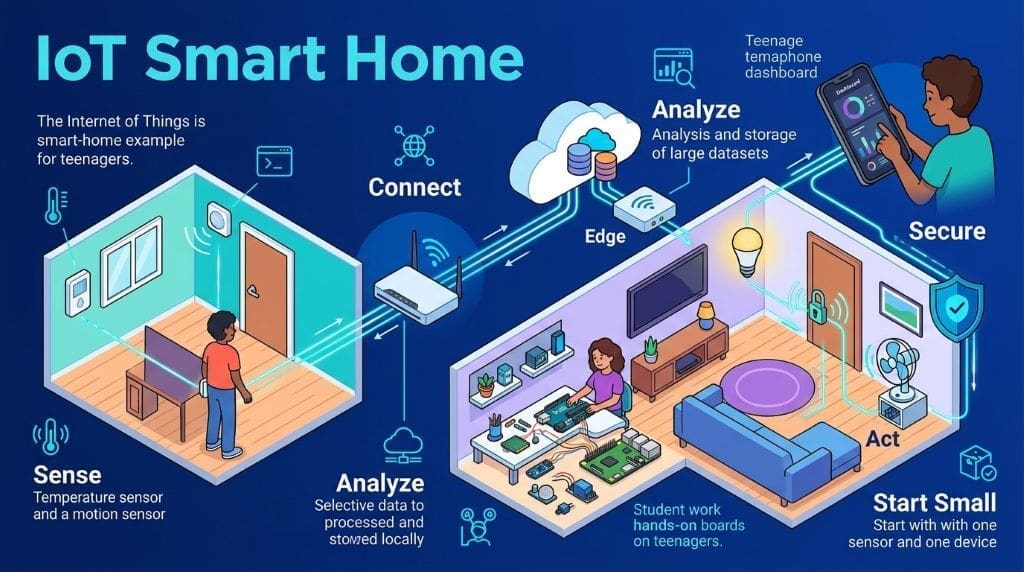
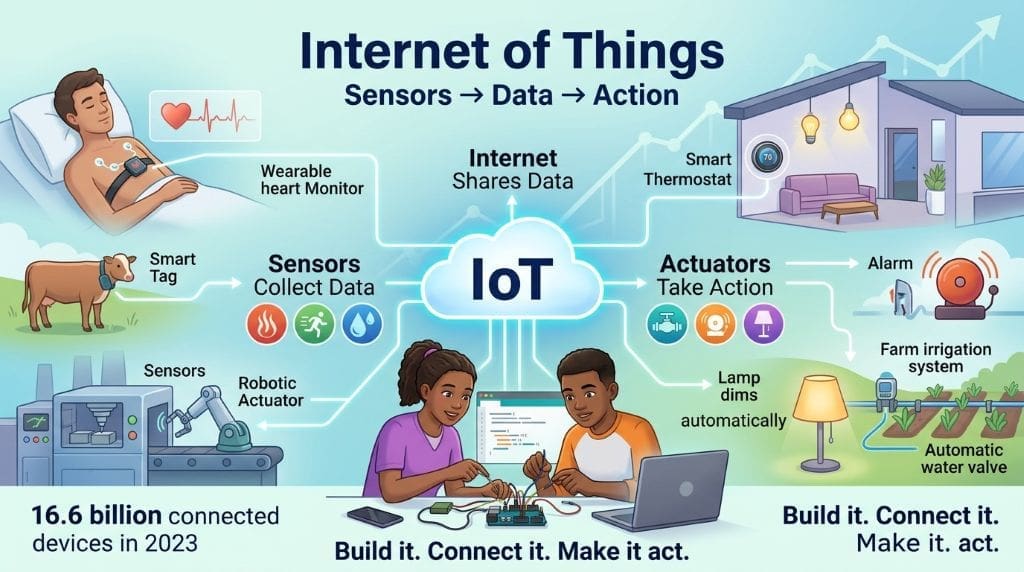
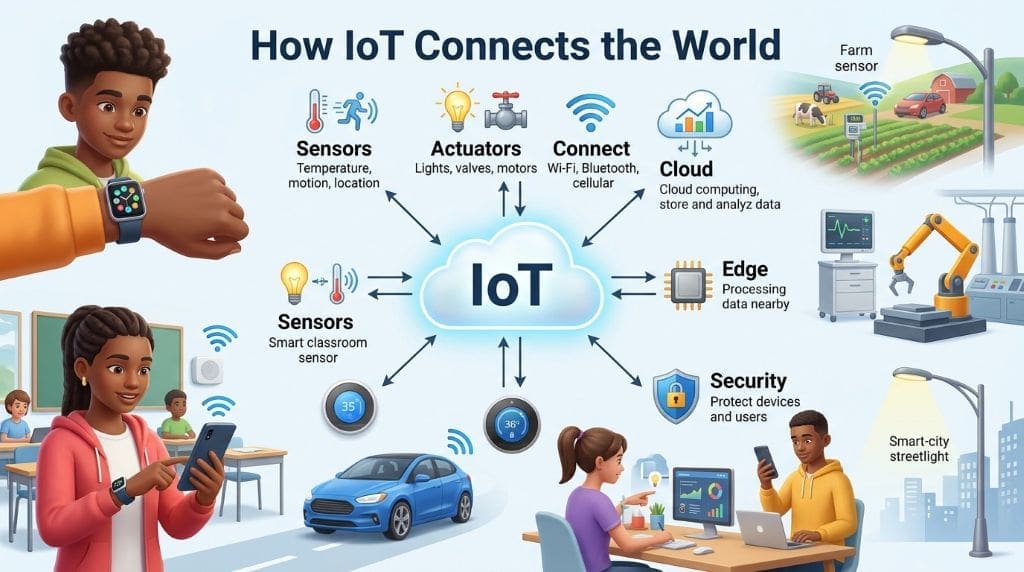
The Internet of Things (IoT) is a network of physical devices that collect, exchange, and act on data via the internet. In a smart home, sensors detect conditions, while actuators perform actions. Connectivity moves information between devices, and cloud computing stores and analyzes data. Edge computing processes selected data locally, reducing latency. IoT platforms connect devices, dashboards, rules, and users, with data security protecting all stages. These ideas create learning opportunities: students can build smart home projects that are perfect for students using Arduino, Raspberry Pi, sensors, relays, and software, and study automation, networking, programming, electronics, and privacy. This guide presents smart home projects for different skill levels, including safety, system planning, testing, and career relevance. The goal is practical learning, not expensive equipment, with each project starting as a small experiment.
Key Takeaways
- Smart homes combine sensors, actuators, networks, software, and security.
- Arduino is well-suited to direct hardware control and simple embedded projects.
- Raspberry Pi is well-suited for gateways, dashboards, databases, and local services.
- Students should begin with low-voltage circuits and clear test goals.
- Privacy and security belong in every Internet of Things project.
- Advanced builds can support portfolios, research, and career preparation.
- Strong documentation matters as much as successful hardware operation.
How does the Internet of Things support smart home learning?
Smart home projects for students demonstrate how the Internet of Things helps learners connect theory with visible results. A temperature sensor produces a value. A program interprets that value. Then, an actuator responds to a chosen condition. This sequence teaches input, processing, output, and feedback. Those ideas appear in robotics, industrial automation, medical devices, and transport systems. Students also learn that connected devices need more than code. They require power management, communication protocols, data storage, and maintenance. Research on IoT education highlights hands-on work as a useful learning method (Pereira et al., 2021). However, a project should remain small during its first version. A single sensor and LED can teach the complete system cycle. Later, students can add dashboards, alerts, and remote access. Visible feedback keeps early learners motivated. Clear constraints also prevent unnecessary complexity.
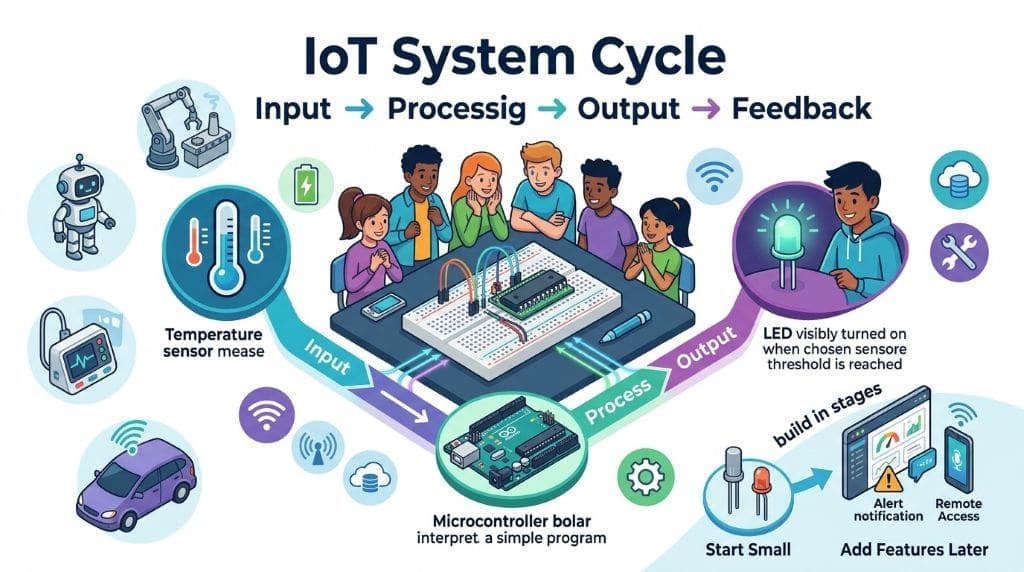
Image Credit: Infographic generated via Google Nano Banana 2.
What is the difference between IoT and related technologies?
- IoT: The Internet of Things connects physical devices. These devices sense, exchange, and act on data.
- Industrial IoT: Industrial IoT supports factories, logistics, energy systems, and infrastructure. It often emphasizes reliability, safety, and predictive maintenance.
- Consumer IoT: Consumer IoT serves homes, wearables, vehicles, and personal devices. Convenience, comfort, and personal control often guide its design.
- Edge Computing: processes IoT data near its source. Local processing can reduce delay and network traffic.
- Cloud Computing: Cloud Computing stores IoT data remotely. It also supports large-scale analysis, dashboards, backups, and remote services.
These categories can overlap within a single smart home system. A Raspberry Pi may provide edge processing. A web service may provide cloud storage. A phone may control consumer devices. Meanwhile, a similar design can monitor a laboratory or workshop. Students should compare these categories before selecting project features. This comparison builds accurate technical vocabulary. It also prevents confusion between a device and a complete system. Systems thinking becomes especially important during advanced builds. A sensor alone does not create useful automation. Its value depends on decisions, actions, users, and safeguards.
Why do smart home projects for students need system planning?
A successful student smart home project starts with a clear problem statement. For example, one student might focus on monitoring room temperature, while another aims to reduce unnecessary lighting. The problem should specify users, conditions, actions, and limits. Next, students need to draw a simple block diagram illustrating sensors, a controller, a network, and actuators. It should also include power sources and data destinations. This step helps identify any missing components before building. Afterwards, students can prepare a basic bill of materials, noting voltage ratings, communication methods, and estimated costs. Well-organized planning documents facilitate teamwork and aid students in explaining their choices during assessments. Overall, defining measurable success criteria—such as detecting movement within five seconds or activating a light below a certain voltage—strengthens the project.
What are the best beginner smart home projects for students?
Beginner builds for smart home projects for students should use low-voltage components and offer immediate visual or audible feedback. Arduino boards work well for these activities because they provide simple programming and accessible digital pins. Students can connect sensors without building a complete computer system. However, they must understand ground connections and voltage limits. A breadboard helps during early testing. Students should inspect every connection before applying power. They should also change one component at a time. This practice makes faults easier to locate. Basic troubleshooting teaches patience and scientific reasoning. Learners can record expected outputs beside actual outputs. They can then test whether code, wiring, or hardware caused differences. These projects also introduce calibration. A sensor reading is not automatically an accurate measurement.
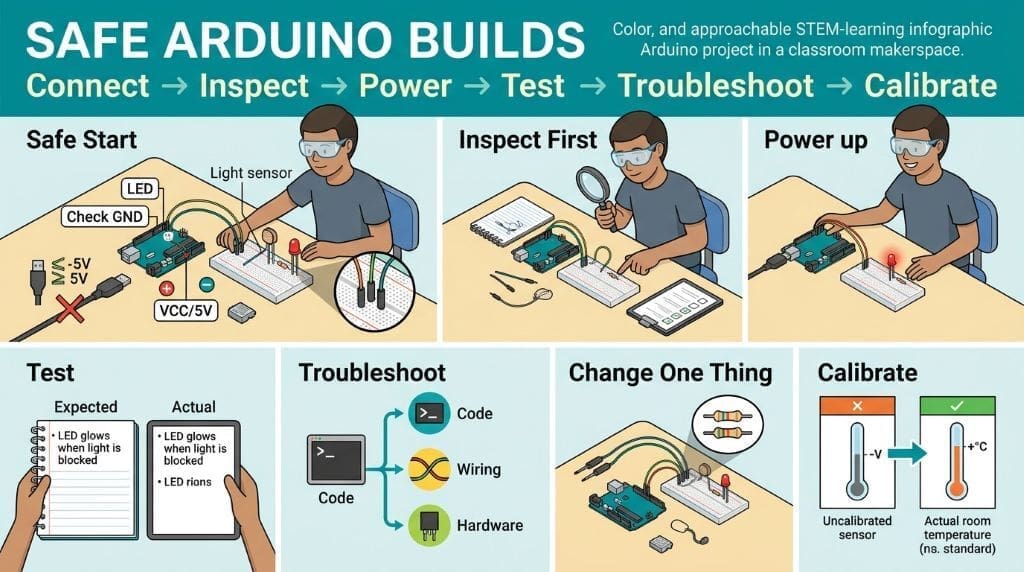
Image Credit: Infographic generated via Google Nano Banana 2.
Which smart home projects for students work best with Arduino?
1. Automatic night-light
This project uses a light-dependent resistor. The sensor detects surrounding brightness. Arduino reads the changing analog value. A program compares that value with a threshold. If the room becomes dark, an LED turns on. Students can later add a potentiometer. The potentiometer allows manual threshold adjustment. They should test the circuit under different lighting conditions. Direct sunlight may produce different readings than indoor lamps. Students should record values before selecting a threshold. Calibration makes the project more reliable. The project also teaches conditional logic and analog input. A transistor can control a larger low-voltage lamp. Students should avoid mains electricity during beginner work. A teacher can demonstrate safe isolation using approved modules. The final report should explain limitations. For instance, shadows may trigger the lamp unexpectedly.
2. Temperature-based fan controller
A temperature sensor can control a small DC fan. Arduino reads temperature at regular intervals. The program compares readings against selected limits. When temperature rises, the fan starts. When temperature falls, the fan stops. Students should use a transistor or motor driver. Arduino pins cannot safely power most motors directly. A separate supply may also power the fan. Grounds must connect correctly between the circuits. Students can add a display for local readings. They can also log measurements through serial output. Hysteresis prevents rapid switching near thresholds. For example, the fan may start at 28 degrees. It may stop only after reaching 26 degrees. This gap reduces unnecessary switching. Students can test the system inside a closed container. They should never block ventilation around active components.
3. Motion-activated room light
A passive infrared sensor can detect movement. Arduino reads the sensor’s digital output. The program starts a timer after detection. An LED remains active for a selected duration. Then, the light switches off automatically. Students can alter the timeout through code. They can also add a second sensor. This change introduces multiple input conditions. A useful extension adds a brightness sensor. The light then activates only during darkness. Automation logic becomes more realistic with two conditions. Students should discuss false triggers and missed movement. Pets, heat sources, and open windows can affect readings. The system should not claim perfect security. Instead, it demonstrates presence detection. Students can document response time and detection range. This project also introduces user comfort. Bright lights should not activate unnecessarily.
4. Water-leak warning system
A water sensor can detect moisture near appliances. Arduino reads the sensor output. A buzzer sounds after water reaches its contacts. An LED provides a second warning. Students can add a test button. The button helps verify the alarm regularly. A later version can send notifications through another board. However, the beginner version should remain local. Local alarms work during internet outages. Reliability matters more than remote control here. Students should place sensors safely and avoid exposed mains wiring. They should also protect electronics from moisture. The final demonstration can use a small water container. It should not involve real household appliances. Students can compare different sensor placements. They can record detection delay and recovery time. This project introduces safety monitoring and preventive maintenance.
5. Door-open indicator
A magnetic reed switch can detect door position. Arduino reads whether the switch remains closed. An LED shows the door state. A buzzer can sound after prolonged opening. Students can add a seven-segment display. They can also count opening events. This creates a simple activity log. A later version stores events on a memory card. Students should consider privacy before adding remote access. Door activity can reveal household routines. Data minimization means recording only necessary information. The project can operate entirely offline. This arrangement suits classrooms and public demonstrations. Students can test different magnet distances. They should measure the point where detection fails. The report should describe installation limitations. Metal surfaces may change sensor behavior. Loose mounting can also create inconsistent results.
These beginner builds share a common learning pattern. Each project senses a condition and produces an action. Students can compare their block diagrams. They can identify shared components and different risks. Later, they can replace threshold rules with adjustable settings. That change introduces user-centered design. A working prototype should also include a test plan. Students can test normal, boundary, and failure conditions. Repeatable testing separates a demonstration from an experiment. Teachers can assess wiring, code, documentation, and safety. Students should explain why they selected each component. They should also state what the system cannot do. This habit builds honest technical communication. It prevents exaggerated claims about smart home performance.
How can Raspberry Pi expand smart home projects for students?
Raspberry Pi computers support more complex applications. They can run Python programs, databases, web servers, and dashboards. They can also connect with USB devices and network services. A Pi can act as a local IoT gateway. It can collect data from several microcontrollers. Then, it can display readings through a browser. Students learn Linux commands, networking, and software deployment. These skills complement Arduino hardware knowledge. However, Raspberry Pi systems need careful configuration. Students should change default passwords immediately. They should update software through trusted sources. They should avoid exposing services directly to the public internet. Local access provides a safer starting point. A project can work through the home network first. Remote access can come later through secure methods. Students should record every configuration change. This record supports troubleshooting and reproducibility.

Image Credit: Infographic generated via Google Nano Banana 2.
Which smart home projects for students are suitable for Raspberry Pi?
6. Local environmental dashboard
A Raspberry Pi can collect temperature and humidity readings. First, students can connect sensors through USB, GPIO, or a microcontroller. Next, Python can read the values at regular intervals. After that, a lightweight database can store timestamped measurements, and consequently, a local webpage can display recent readings. Furthermore, students can add daily and weekly charts. Overall, this project introduces data pipelines and visualization. Additionally, it also demonstrates edge processing. In fact, the Pi can calculate averages without sending raw readings elsewhere. As a result, local analytics supports privacy and faster response. However, students should define suitable sampling intervals because excessive sampling creates unnecessary storage and processing overhead, while infrequent sampling may miss important changes. Moreover, the project should include notes on sensor calibration. For example, students can compare readings against a second instrument. Finally, they should state measurement uncertainty in their report.
7. Smart energy-use monitor
Students can monitor low-voltage devices safely. For instance, they might measure a battery-powered lamp or USB fan. To accomplish this, a current sensor can provide approximate consumption data, and subsequently, the Raspberry Pi can store and display the readings. From there, students can calculate energy use over time. In particular, they can compare standby and active states. As a whole, this project teaches measurement, units, and interpretation. In addition, it also introduces sustainability discussions. Above all, electrical safety must remain the priority. Consequently, students should not open household meters or mains equipment. Instead, certified monitoring plugs provide safer alternatives.
Furthermore, a teacher should inspect all proposed hardware. Afterward, students can create an energy-saving recommendation. Importantly, they should distinguish measured results from estimates. Without a doubt, this distinction improves scientific accuracy. Later on, the project can support automated shutdown rules. However, those rules should include manual override options.
8. Voice-free room automation
A Raspberry Pi hosts local control pages allowing users to control lights, fans, or LEDs via buttons and apply time-based rules, like turning on a desk lamp after sunset. Students can create user roles, add manual switches for safety, and avoid reliance on voice recordings, supporting privacy. The project begins with a web app teaching HTML and Python; later, students can add MQTT for device messaging. The focus is on interoperability, defining topics, payloads, and device identities. Students should test network failures to ensure the system returns to a safe state. Every action must have a clear explanation.
9. Indoor air-quality alert
Students can connect an approved air-quality sensor. The Raspberry Pi can collect readings periodically. A dashboard can show trends and warning levels. A buzzer or LED can signal selected conditions. The project should avoid medical claims. Low-cost sensors often provide approximate measurements. They may need warm-up time and calibration. Students should read the manufacturer’s technical documentation. They should also explain environmental limitations. Responsible interpretation matters greatly here. A reading can indicate a concern without diagnosing a cause. Students can compare readings during different activities. Cooking, cleaning, and ventilation may change results. The report can suggest actions, such as opening windows. It should not replace professional safety equipment. This project connects computing with public health education.
10. Local security event logger
A Raspberry Pi can record door or motion events. It can receive input from Arduino boards. A local database can store event times. A small dashboard can display recent activity. Students can add a local audible alert. They should avoid storing images initially. Images create greater privacy and storage concerns. If a camera is used, consent becomes essential. Students should restrict access to authorized users. Privacy by design should guide the project. Event records should have a deletion schedule. The system should also show when recording occurs. Students can test incorrect passwords and lost network access. They can document how the system responds. This project introduces authentication and audit logs. Those topics connect directly with cybersecurity careers.
A Raspberry Pi build should not become a collection of features. Students should first create one reliable data path. The path might run from sensor to database. Next, they can add a dashboard or alert. Only then should they consider remote control. This sequence limits debugging complexity. It also teaches incremental development. A classroom team can divide work by subsystem. One student can test sensors. Another can write the data service. A third can document security and results. Clear interfaces help these parts work together. Teams should define message formats before coding. They should use version control for important files. A short demonstration should include failure behavior. That requirement encourages robust engineering.
How do advanced smart home projects for students use AI and cloud services?
Advanced projects integrate multiple devices and services like edge analytics, cloud storage, or machine learning. For example, students can classify sensor data to identify activity patterns or occupancy changes. They should start with a small, labeled dataset, excluding unnecessary personal info. A model must support clear decisions; explainability helps evaluate wrong predictions. Edge computing processes sensitive data locally, while cloud supports larger tests and backups. Each design needs a data-flow diagram showing collection, transmission, storage, and deletion. Students should also document provider terms and costs, as free services may change limits unexpectedly. A local fallback ensures demonstrations remain dependable if the internet fails, maintaining smooth classroom presentations.
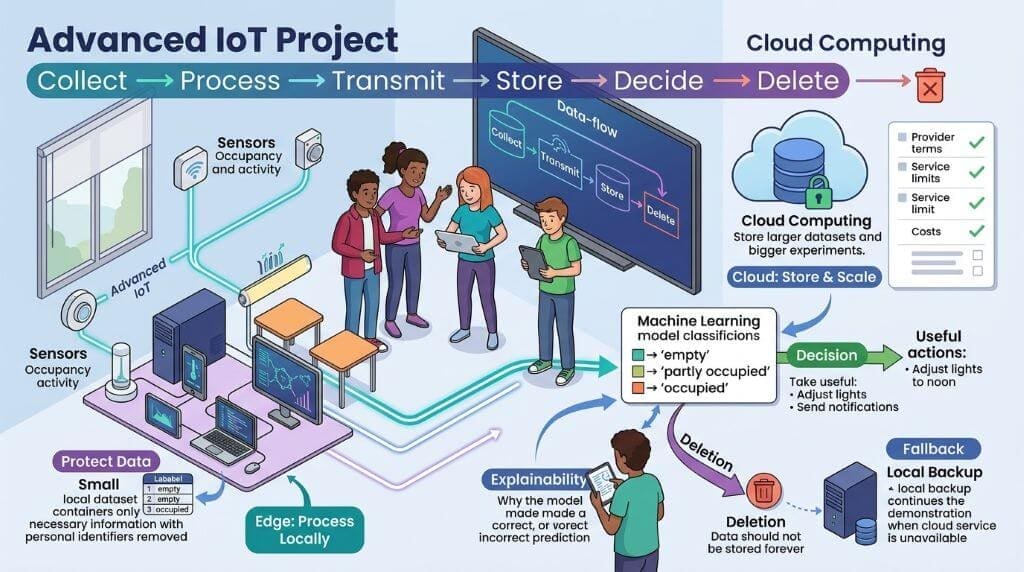
Image Credit: Infographic generated via Google Nano Banana 2.
How should students connect Arduino, Raspberry Pi, and cloud platforms?
Arduino boards often handle direct sensing and actuation. Raspberry Pi boards can manage local coordination. A cloud platform can provide remote storage or analysis. These roles should remain clearly separated. Arduino may publish readings through serial or wireless links. The Raspberry Pi can validate and format those readings. It can then send selected data to a cloud endpoint. Data filtering reduces exposure and bandwidth use. Students should never upload passwords inside source code. They should use environment variables or secure configuration files. Test accounts should contain fictional information. The project should also handle service outages. Local control should continue when cloud services fail. Students can compare MQTT, HTTP, and WebSocket communication. Each method has different strengths and trade-offs. The final report should justify the selected protocol.
What advanced project ideas build useful technical skills?
One advanced idea is adaptive lighting. The system combines occupancy, brightness, and time. A rule engine then adjusts a low-voltage lamp. Another idea is predictive maintenance for a small fan. Students can study changes in vibration or temperature. A third idea is a privacy-focused occupancy estimator. It uses non-camera sensors instead of images. A fourth idea creates a digital twin. The twin displays device states and recent events. A fifth idea studies energy demand. It compares usage patterns across different schedules. Research questions improve these projects. Students can ask whether local processing reduces response time. They can measure accuracy before and after calibration. They can compare manual and automated control. Each experiment needs defined variables and repeated trials. Students should report negative results honestly. A failed hypothesis can still produce valuable learning.
Advanced work also introduces system resilience. Devices may lose power or network access. Sensors may produce impossible values. Batteries may become weak. Cloud services may become unavailable. A strong design identifies these conditions early. It then chooses a safe response for each one. For example, a heating control should fail safely. It should not continue indefinitely after a faulty reading. Fault handling requires both code and hardware planning. Students can create watchdog timers and input validation. They can also add local status indicators. A maintenance log can record restarts and errors. These features mirror professional engineering practices. They also make demonstrations more convincing. Reliability should receive assessment time equal to innovation.
What should students know about IoT security and privacy?
The Internet of Things expands connected entry points, making security and privacy essential in smart home projects for students. Devices may contain credentials and personal data, so weak passwords, unpatched software, and insecure communication create risks. Students should use unique passwords, remove unused services, apply least privilege, and isolate experimental devices from household systems. They should maintain an inventory of devices, owners, software, and update dates. Privacy also requires careful data collection. Students should collect only necessary information, obtain consent, limit access, set retention periods, and avoid personal recordings without permission. Synthetic data and local dashboards can reduce privacy risks. Encryption should protect data during transmission, while access controls should protect stored records.

Image Credit: Infographic generated via Google Nano Banana 2.
Security testing can remain simple and practical. For example, students can attempt incorrect logins, disconnect the network, send malformed sensor values, or restart devices unexpectedly. These tests help evaluate how well a system handles interruptions and unexpected inputs. Each test should have an expected result, and any failure should lead to corrective action. After testing, students should update dependencies and remove demonstration accounts before submission. Additionally, threat modeling helps prioritize likely risks. Students do not need advanced penetration-testing skills; instead, they should identify valuable data and possible attackers, then select reasonable protections. Teachers can grade the quality of this reasoning. Ultimately, a secure project is not necessarily expensive because good configuration often provides meaningful improvements.
How do students test and document smart home projects?
A test plan should connect requirements with evidence. Each requirement needs a measurable pass condition. For example, an alarm may respond within five seconds. Another requirement may state that local control survives internet loss. Students should perform multiple trials. They should record environmental conditions during tests. They should explain unusual results. Evidence tables make reports easier to evaluate. Photographs can show safe construction and component placement. Code comments should explain decisions, not obvious syntax. A wiring diagram should identify power and ground paths. Students should include a section on known limitations. This section increases credibility. It also suggests useful future improvements. Teams should use version control when possible. Commit messages can show how problems were solved. Documentation therefore becomes part of the engineering product.
What equipment and skills do learners need?
A beginner kit may include an Arduino board. It may also include a breadboard and jumper wires. Students can add LEDs, buttons, and resistors. A light sensor, temperature sensor, and motion sensor can help. A Raspberry Pi requires storage and reliable power. Students should also use a multimeter. Safety glasses may support workshop activities. Low-voltage equipment reduces early electrical risk. Learners need basic programming skills first. C or C++ is helpful for Arduino development. Python suits Raspberry Pi projects. HTML and JavaScript support local dashboards. Networking knowledge becomes important later. Students should understand IP addresses and ports. They should also learn data formats, especially JSON. Git supports collaborative development and recovery. Technical writing helps students communicate results. These skills develop gradually through project work.
Teachers can structure projects through staged milestones. The first milestone confirms individual components. The second connects one sensor and one output. The third adds timing or data storage. The fourth introduces communication. The final milestone tests security and failure behavior. This structure supports different learner speeds. It also reduces the fear of complex systems. Scaffolded learning allows students to build confidence. Teachers can provide starter code with missing sections. Students then complete and test those sections. Advanced learners can design additional improvements. Peer review can identify unclear explanations. Demonstrations should assess process, not only appearance. A polished enclosure cannot hide unsafe wiring. Similarly, a beautiful dashboard cannot prove reliable sensing. Assessment should reward measurement, reasoning, and responsible design.
What career opportunities can smart home projects create?
IoT projects develop skills valued across many industries, including embedded engineering, automation, data analysis, cloud computing, cybersecurity, and product design. These interdisciplinary abilities can strengthen a student’s portfolio. A portfolio should include diagrams, code, tests, limitations, and a short demonstration video. A public repository can show development history, but students must remove passwords and private data before sharing. Career changers can use small, reliable projects to demonstrate transferable problem-solving skills. One completed build shows competence, while two connected projects demonstrate progression. Clear explanations help nontechnical reviewers understand the project’s value

Image Credit: Infographic generated via Google Nano Banana 2.
The seven-point learning path below connects concepts with career growth:
- Understand foundational ideas. Learn sensing, processing, acting, feedback, and measurement.
- Identify system components. Study sensors, actuators, controllers, power, and gateways.
- Compare communication methods. Practice serial communication, Wi-Fi, Bluetooth, MQTT, and HTTP.
- Build useful applications. Create lighting, climate, safety, energy, or accessibility systems.
- Address security concerns. Use strong credentials, updates, encryption, isolation, and privacy controls.
- Develop implementation skills. Test hardware, write code, document decisions, and analyze data.
- Connect projects with careers. Build portfolios for embedded, cloud, data, security, and automation roles.
This progression supports both students and educators. Beginners can stop after the first few stages. Advanced learners can complete all seven stages. Career changers can focus on portfolio evidence. Teachers can map stages against course outcomes. Progressive complexity keeps learning manageable. It also creates opportunities for group work. Each stage adds a new type of reasoning. Students move from assembling parts toward designing systems. That movement reflects professional development. A project should therefore show learning, not merely functionality. The best portfolio explains choices and trade-offs. It also describes how the design could improve.
How can teachers make smart home projects accessible?
Accessibility begins with flexible project roles. Not every student must solder or write code. One learner can document testing. Another can create the interface. A third can analyze data. Teams can rotate roles across milestones. Visual diagrams can support students who need clearer system views. Simulation tools can support learners without access to hardware. Teachers can provide prepared sensor modules when appropriate. Multiple pathways maintain the same learning outcomes. Instructions should use short steps and clear checks. Assessment rubrics should separate technical accuracy from presentation style. Students can also design accessible controls. Large buttons, clear colors, and audible alerts support users with different needs. A smart home should serve people, not only demonstrate technology. This principle improves both engineering and social understanding.
A classroom project should also consider cost and sustainability. Schools may share equipment through rotating stations. Students can reuse boards and sensors across teams. Damaged components can become troubleshooting examples. Teachers can discuss repairability and electronic waste. Cloud services should not create unexpected expenses. Local tools often support dependable demonstrations. Resource awareness is an important engineering habit. Students can compare several components before purchasing. They should identify open documentation and community support. A project can use cardboard enclosures instead of costly cases. Reusing materials also encourages creative problem-solving. Teachers should label classroom equipment clearly. Inventory records reduce loss and confusion. Sustainable choices strengthen the project’s social value.
How This Guide Was Compiled
This guide integrates core IoT research, standards guidance, and classroom design principles. It specifically relies on peer-reviewed sources for discussing IoT architecture, education, security, and practical use cases. Notably, NIST publications serve as the main cybersecurity evidence base. Additionally, a recent industry report, IoT Analytics’ State of IoT—Spring 2024, offers current market insights, though estimates differ across sources. As a result, this article avoids presenting uncertain figures as definitive. The 2024 AI Index Report from Stanford HAI acts as the statistical basis for a brief discussion on artificial intelligence, used solely for AI-related context within IoT systems and not as primary evidence of IoT adoption. Emphasizing source discipline ensures accurate educational writing, so readers should verify publication dates and editions, and review component documentation before building circuits. The links provided prioritize open-access academic and government materials.
I don’t have a personal classroom experience. Instead, this guide uses an evidence-based classroom observation pattern. In many hands-on IoT lessons, learners first struggle with ground connections. They often blame code before checking wiring. A structured test sequence changes that behavior. Students inspect power, grounds, inputs, and outputs separately. Then, they test the complete system. The sequence of instruction significantly impacts confidence levels and the quality of troubleshooting. Each educator’s own class should verify this observation. Teachers can record the most common faults and response times. They can then adapt future project instructions. Such records create genuine local evidence of teaching. They also prevent unsupported claims about student performance. This approach respects both accuracy and classroom diversity. Different learners may need different equipment, pacing, and support.
FAQs about smart home projects for students
Arduino is ideal for learning microcontroller programming, sensors, and hardware control. Raspberry Pi works like a small Linux computer and supports Python, web applications, databases, and networking. Beginners can start with Arduino and later use both devices together.
A low-voltage night-light is a safe first project because it uses a sensor, resistor, controller, and LED. Teachers should inspect wiring and explain resistor values and ground connections before students add displays, motors, or relays
Yes. Arduino can control devices locally, while Raspberry Pi can host dashboards on a local network. Offline projects improve privacy and reliability. Secure authentication and encryption should be added if remote access is later required.
Beginners need only basic knowledge of variables, conditions, loops, and functions. Raspberry Pi projects introduce Python and operating-system concepts, while dashboards may require web programming. Practice and understanding starter code are more important than previous experience.
Students can use AI for tasks such as occupancy classification or anomaly detection. They should collect minimal data, test errors, maintain human oversight, and explain the model’s limitations. Local processing can also improve privacy.
A portfolio should include the problem, diagrams, code, components, testing, safety information, photos, an operation video, lessons learned, and future improvements. Additionally, students must remove passwords and other credentials from public files.
Yes. These projects demonstrate planning, debugging, communication, and technical learning. Students should choose projects related to their target careers and clearly explain their personal contributions.
Suggested Related Learning
Students can compare this project path with additional Arduino tutorials and electronics learning materials from EntechOnline’s technology resources. Raspberry Pi learners can also consult IoT and embedded systems guidance while checking component documentation and security requirements. These links should supplement, not replace, official board documentation. Students should verify circuit diagrams before applying power. They should also avoid copying unknown code into connected systems. SourceFrom where the toxicant is released, such as a factory, farm, or vehicle. More checking remains a core IoT skill. A reliable tutorial explains voltage, dependencies, permissions, and limitations. Educators should review external links before classroom use. That review protects learners from unsafe or outdated instructions. It also models responsible digital research.
Verified Resources
The following sources are open-access academic or government resources. They support IoT concepts, education, cybersecurity, and connected-device research.
- National Institute of Standards and Technology. (2020a). IoT device cybersecurity capability core baseline (NISTIR 8259A).
https://doi.org/10.6028/NIST.IR.8259A
- National Institute of Standards and Technology. (2020b). Foundational cybersecurity activities for IoT device manufacturers (NISTIR 8259).
https://doi.org/10.6028/NIST.IR.8259
- National Institute of Standards and Technology. (2022). Cybersecurity labeling programs for consumers: Internet of Things devices and consumer software (NISTIR 8425).
https://doi.org/10.6028/NIST.IR.8425
- Pereira, C., Aguiar, A., & others. (2021). The Internet of Things in education: A systematic review of learning applications and challenges. Computer Engineering, 5(2), 302–?.
https://academic.oup.com/ce/article/5/2/302/6294582
- PLOS ONE. (2020). Article e0238480: Open-access research on Internet of Things systems and applications. PLOS ONE, 15(8).
https://doi.org/10.1371/journal.pone.0238480
- ScienceDirect. (2024). Open-access research article, PII S1574013724000200, on current Internet of Things developments. Internet of Things.
https://www.sciencedirect.com/science/article/pii/S1574013724000200
- American Journal of Computer Science and Technology. (n.d.). Open-access IoT research article 4260.
https://ajcst.co/index.php/ajcst/article/view/4260
- IEEE. (2013). Open-access conference paper, document 6740844, concerning Internet of Things systems.
https://ieeexplore.ieee.org/document/6740844
- Stanford Institute for Human-Centered Artificial Intelligence. (2026). AI Index report 2026.
https://hai.stanford.edu/ai-index/2026-ai-index-report
List of terms
- Source
